Cherry Chocolate Coconut Ice Cream

It seems there is a heat wave sweeping across the entire continent. As much as I despise -30°C, I am really not a fan of +30°C either. I like to be NOT bursting into flames, thank you very much. Every summer I am so grateful for the air conditioning that my dad installed as a housewarming (housecooling?) present when we first moved in. Being able to make my house feel like we’re at the South Pole when outside feels like walking on the sun is seriously awesome.
I skipped out on blogging yesterday in lieu of getting out on the lake. We waited until after supper, because of the heat, and it was perfect boating weather! Anya is still deathly afraid of being on the boat which makes it tough… not only have to hold Wylder and spot the boys on the tube, I also have to hold her hand the entire time. I took her onto the tube with me and she would go from okay to freaked out if she got so much as a drop of water on her. A big moment for her last night was getting off the tube and into the water for a little swim. Afterwards she said “I am not a-scared of the boat anymore!”. 
Ice cream is the essence of summer but commercial ice creams have ingredients (and additives) that I cannot have. So why not make our own! There are only 4 ingredients in this ice cream. 4 pronounceable ingredients (which has become very important to Adam after watching Jamie Oliver’s Food Revolution).  It’s a good idea to prep this ice cream mix ahead of time and then use your ice cream maker right before serving. If you freeze it afterwards it becomes very hard and slightly crumbly…but it still tastes great! 
Cherry Chocolate Coconut Ice Cream

Ingredients

1 cup sweet cherries, pitted and quartered
2 cans coconut milk (not light)
3 tablespoons dutch processed cocoa
1 tablespoon unpasteurized honey
Directions

In a small bowl, combine quartered cherries with 1 can of coconut milk. Set aside for a couple of hours.
In a small pot, combine the other can of coconut milk with cocoa and honey. Heat over medium until it is hot but not boiling. Remove from heat and cool to room temperature. 
Strain the cherry/coconut milk mixture into the pot and reserve the cherries. Stir and set the mixture into the fridge to cool completely. Rinse off the cherries and refrigerate until later.
Once the mixture is cooled, make the ice cream according to the ice cream maker’s directions. When the ice cream is ready, turn half of it into a large bowl, top with reserved cherries, and finish off with the remaining half of the ice cream. Stir a few times to incorporate the cherries and put it all into the freezer, if you’re not serving immediately.

Allergy Free Wacky Cupcakes

My boys attend a school with a nut-free policy so finding nut-free foods is just something we do. I send them appropriate foods and thank my lucky stars that we don’t have to deal with such severe allergies in our own home. When my nephew was diagnosed with multiple food allergies, I realized just how fortunate we were. His allergies included nuts, dairy, eggs, bananas, and barley. I couldn’t even wrap my mind around what someone with so many allergies would even eat! My sister was a trooper. She cut out all of these foods so that she could continue to breastfeed him.
When Adam started writing down the friends he wanted to attend his birthday party last weekend, he reminded me that R is allergic to nuts and T is allergic to dairy and eggs. Both friends RSVP’d as attending and I immediately called my sister to get a recipe for the cake. The recipe is unlike anything I have ever made before and Adam worried that it would taste terrible (as I poured the balsamic vinegar into the batter).
Although T brought her own food, I felt relieved knowing that all of the food I had prepared was allergy friendly. Better safe than sorry, right? I was just as relieved that the cupcakes tasted like cupcakes! 
Allergy Free Wacky Cupcakes

Ingredients

1 1/2 cups flour
3 tablespoons cocoa powder
1 cup sugar
1 teaspoon baking soda
1/2 teaspoon salt
1 tablespoon balsamic vinegar
5 tablespoons oil (*I used olive oil)
1 teaspoon vanilla
1 cup water
Directions

Preheat oven to 350°F. Line a muffin tin with 12 cupcake liners.

Combine dry ingredients in a mixing bowl and mix thoroughly. Mix wet ingredients in a separate bowl and stir to combine. Add the wet ingredients to the dry ingredients and mix until smooth (do not beat).

Pour into lined muffin cups and bake for 20 minutes (or until a toothpick inserted into the center comes out clean). Cool for 5 minutes before removing from the muffin tin.

Top these with an allergy-free icing if desired. I mixed up some vegetable shortening, icing sugar, cocoa, and rice milk for the icing.

Recipe adapted from Kids With Food Allergies.

Grain-Free Coconut Pound Cake

Anyone who has ever been to our house for a meal (and even the people who haven’t) know that I am a dessert person. I keep mental notes of which desserts I’ve served to which people and I always try to serve something different the next time they are over. 
After switching to primal eating, I was worried that my dessert days were over. No flour and no sugar? How is that even dessert?? A few weeks into the new diet I realized that sugar is a lot sweeter than I remember. When we invited friends over for supper, I knew I would be making a dessert that they would fall over themselves for. I also knew that I had to make something for myself because of my ability to have just a smidge of dessert. I needed something sensible. Sweet enough to satisfy my sweet tooth with no refined sugars and no grains. 
I changed up the original recipe to use lemons instead of oranges. Lemons make me think of summer. I topped mine with honey coconut ice cream and strawberries but I used half of this loaf to make a fruit trifle for our guests (along with a chocolate creme pie for the kids). 
Grain-Free Coconut Pound Cake

Ingredients

5 eggs
1 cup premium coconut milk (not low fat)
2/3 cup freshly squeezed lemon juice (3-4 lemons)
zest from 1 lemon
1/2 cup melted butter (or melted coconut oil)
2 tablespoons honey
1/4 teaspoon salt
2 teaspoons baking powder
1 cup coconut flour
Directions

Preheat oven to 350°. Line a loaf pan with parchment paper and great with coconut oil. 
Combine dry ingredients (coconut flour, baking powder, and salt) in a medium bowl. In a separate bowl, combine wet ingredients (eggs, coconut milk, lemon juice, lemon zest, melted butter, and honey) and beat to combine thoroughly. Add dry ingredients to wet ingredients and mix until smooth.
Pour batter into prepared loaf pan. Bake from 50-60 minutes (or until a toothpick inserted into the center comes out clean). Cool in pan for 10 minutes, remove from pan, and cool completely before serving.
Recipe adapted from This Primal Life.

Vinarterta ~ Icelandic Cake

The boys’ school does a cultural lunch the year they are in second grade. Adam, the second grader, had his cultural lunch today and I made vinarterta. Vinarterta is the strangest cake you’ll ever encounter… thin layers of almond flavoured cake, separated by pureed prunes, and topped with an almond flavoured icing.
In case you missed that…there’s prunes in the cake. PRUNES! I don’t think it was until I was 12 years old that I realized there were prunes in the cake. By then, I was totally addicted. Vinarterta is my kryptonite. My powers of will are useless against the vinarterta. Since it was served almost exclusively at Christmas, I would spend the year anticipating a slice (or five) of it. As an adult, I have received an entire vinarterta for Christmas and occasionally my mom will bring a portion to me when she visits.
My kids have also become suckers for this delicate cake. The cultural lunch was full of the most beautiful, delicious food I have ever seen and I have no doubt there was a ridiculous amount of leftover food. My container of vinarterta was returned half full…until the boys got to it on the drive home. It was a vinarterta massacre! Top halves eaten off. Crumbs everywhere. And just a few pieces of vinarterta remained.
Vinarterta

Ingredients

Cake:
1 1/2 cups margarine, softened
1 1/2 cups sugar
3 eggs
1 1/2 teaspoons vanilla extract
1 1/2 teaspoons almond extract
6 cups all purpose flour
3 teaspoons baking powder
3/4 teaspoon salt
3/8 cup milk
Filling:
2 pounds pitted prunes
1 teaspoon white sugar
1 teaspoon flour
1 teaspoon lemon juice
1/2 teaspoon cinnamon
2 cups water
Icing:
2 1/2 cups icing sugar
2 tablespoons melted butter
2-5 tablespoons milk
1 teaspoon almond extract
Directions

Preheat oven to 325°. Prepare as many as six 9×13″ baking pans by lining them with a sheet of parchment paper that has been sprayed with cooking spray.
Cream margarine and sugar until fluffy. Beat in eggs, one at a time. Stir in vanilla and almond extract.
In a large bowl, stir flour, baking soda, and salt. Add 1/3 of the flour mixture to the margarine/sugar blend. Add in 1/2 of the milk. Repeat 1/3 flour, remaining 1/2 milk, remaining 1/3 flour. Mix until just combined.
Separate the dough into 6 equal portions. Roll out each piece evenly into the baking dish. Bake until the edges are just browned, 12-15 minutes. Cool completely on a rack.
Puree the prunes in a food processor until smooth. Turn into a medium pot. Stir in white sugar, 1 teaspoon flour, lemon juice, 1/2 teaspoon cinnamon, and 1 cup of water. Heat over medium and continue to stir. Add the water 1/4 cup at a time, stirring thoroughly, until you have added the remaining 1 cup of water. Add more or less water if necessary to keep it a spreadable consistency. Set aside while all of the cake layers finish cooking/cooling.
On a baking sheet, layer cake, 1/5 filling, cake, 1/5 filling, etc… ending with the final cake layer. 
Beat icing sugar with 2 tablespoons melted margarine and 2-5 tablespoons of milk (to get a spreadable consistency). Stir in 1 teaspoon almond extract and beat until smooth and fluffy. Spread the icing over the top of the layered cake and let the cake sit (covered) overnight. Slice into 1/2″ wide rows and then cut each row into 2″ sections. 

Gluten-Free, Sugar-Free Cheesecake

What do you do when you give up sugar, are trying to live gluten free, and are craving cheesecake? Well, you bake yourself a gluten-free, sugar-free cheesecake of course! This is the polar opposite of the cheesecake I just posted. 
My efforts to go sugar free weren’t for nothing. I have been feeling really good lately! And as I slowly move towards a primal diet, I’m finding myself feeling awesome. Less bloated, losing weight, having energy again… I haven’t gotten the rest of my family on board, which makes it difficult, but I can watch them eat the Easter candy with no desire to eat it myself.
Adam was the only one to notice that this cheesecake was different. Perhaps it was different in that we never have ‘plain’ cheesecake. Logan, on the other hand, was completely dumbfounded until he saw me editing the picture to say “gluten-free, sugar-free”. Ha! It is more dense than some of the other cheesecakes I’ve made but hey, it’s a start! And it satisfied my desire to have cheesecake. Win, win!


Gluten-Free, Sugar-Free Cheesecake


Ingredients


2 cups almond meal
2 tablespoons butter, melted
1/4 cup shredded unsweetened coconut
3x 8ounce packages cream cheese, room temperature
2 eggs, room temperature
1/4 cup honey
1/2 cup coconut milk ‘fat’ (do not shake the can, scrape the coconut ‘fat’ from the top)
1 teaspoon vanilla extract

Directions


Preheat oven to 350°F. In a small bowl, stir almond meal, melted butter, and shredded coconut until combined. Press into the bottom of a spring form pan that’s been lined with foil and sprayed with cooking spray. Bake for 10 minutes, until golden brown. Cool while you prepare cheesecake batter.

Reduce heat to 300°F. Beat the cream cheese until smooth. Beat in honey until combined. Add eggs, one at a time, beating well between each. Stir in coconut ‘fat’ and vanilla extract. Pour into cooled crust. Bake for 50-60 minutes, until cheesecake is set. The center of the cheesecake will be a little jiggly still. Cool and refrigerate for at least 4 hours.

Peanut Butter Chocolate Cheesecake

Last week I made the decision to cut sugar out of my diet. Completely. Which also meant giving up coffee because coffee without sugar is just not my thing. I had a headache for 3 straight days and finally, a week later, I feel good. I really put off posting this cheesecake because I was struggling with the sugar addiction. I craved the cheesecake for weeks after it was gone and, if I had another one, I could probably eat the whole thing in one sitting.

I made this as my birthday cake and the week leading up to my birthday I was searching for the perfect peanut butter chocolate cheesecake. This was definitely it. As mentioned in previous posts, my favourite cheesecake bakery has amazing peanut butter chocolate cheesecake…. but this recipe totally blows theirs out of the water!

Be warned, if you are a sugar addict, this will NOT help the addiction.

Peanut Butter Chocolate Cheesecake

Ingredients

2 cups Oreo crumbs
2 tablespoons butter, melted
4x 8 ounce packages cream cheese, room temperature
5 eggs, room temperature
1 cup packed brown sugar
1 cup peanut butter
1/2 cup whipping cream
1 tablespoon vanilla
1 bag mini peanut butter cups
Topping:
1/2 cup peanut butter
6 ounces semi-sweet chocolate
3/4 cup heavy cream
15-20 mini peanut butter cups (saved from the cheesecake ingredients)
Directions

Preheat oven to 350°. Stir together Oreo crumbs and 2 tablespoons melted butter. Press into the bottom of a 9″ springform pan and bake for 15 minutes. Cool.
Beat cream cheese with a mixer until smooth. Add eggs, one at a time, beating well between each. Add sugar, peanut butter, and cream; mix thoroughly. Stir in vanilla. Pour half of the mixture into the cooled crust, layer with 2 cups of mini peanut butter cups, then top with remaining cheesecake mixture.
Bake for 1 to 1 1/2 hours. The sides of the cheesecake should be set but the middle will be a little jiggly. (it should not be runny) Cool slightly then put it into the refrigerator for at least 4 hours. 
Chop up the chocolate and melt it in a double boiler (or microwave). Cool slightly then add all but 1 tablespoon of cream. Stir and then pour over the cool cheesecake (while still in the springform pan). Refrigerate for 30 minutes. 
Place peanut butter and 1 tablespoon of whipping cream in a bowl and microwave until it’s a runny consistency. Either place the mixture in a piping bag or using a spoon, top the cheesecake with a peanut butter swirl. Before the swirl sets, surround the outer edge of the cheesecake with the remaining mini peanut butter cups. 
Recipe adapted from Baking With Ramen.

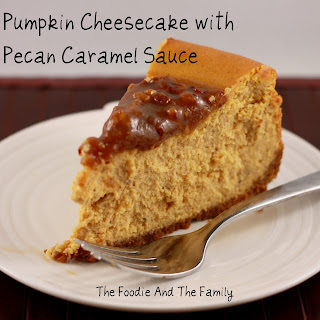
Pumpkin Cheesecake with Pecan Caramel Sauce

Last night I asked my husband what I should blog about and he said “How about your wonderful husband?”. Huh…if he read my blog any, he would realize that I blog frequently about his wonderfulness! Tonight he will get another blog post devoted to him.
You see, my wonderful husband just celebrated his 32nd birthday. We have a tradition in our house that on your birthday you get to choose your birthday supper and dessert. My husband usually says “You pick.” but this year he had it all figured out! We started with a ham, roasted garlic mashed potatoes, and cauliflower au gratin. 
For dessert he is far more laid back. Last year he said he would be fine with just ice cream. This year, however, he wanted pumpkin cheesecake. I knew someday I would rub off on him! Of course I had to add a pecan caramel sauce to make it better but I was excited for his birthday cake. 
Since you’re already reading, help me out with something… Which picture looks better? #1 or #2? I keep going back and forth between which one I like better so I figured I would just post both and see what everyone else thought.
Pumpkin Cheesecake with Pecan Caramel Sauce

Ingredients

2 cups gingersnap cookie crumbs (crushed in a food processor or blender)
6 tablespoons unsalted butter, melted
4 (8 ounce) packages cream cheese, room temperature
1 3/4 cup sugar
1 (15oz) can pure pumpkin (***not pumpkin pie filling)
5 large eggs, room temperature
1 1/2 teaspoons ground cinnamon
1/2 teaspoon ground ginger
1/4 teaspoon ground nutmeg
1/4 teaspoon ground cloves
1/2 teaspoon salt
1 tablespoon vanilla extract
2 tablespoons flour

Pecan Caramel Sauce:
1/2 cup sugar
1/4 cup water
1/4 cup half and half cream
1/2 cup toasted pecans

Directions

Preheat oven to 350°. Combine gingersnap crumbs with melted butter. Press into the bottom of a 9 inch springform pan and partly up the sides. Bake until golden brown, about 10 minutes. Remove from oven and cool while preparing the filling.
In a large bowl, beat cream cheese and sugar on high until light and fluffy, about 2-3 minutes. Add the pumpkin puree and beat until incorporated, scraping the sides once. Beat in the eggs, one at a time, and then add cinnamon, ginger, nutmeg, cloves, salt, and vanilla. Beat until well blended. Add the flour and beat again, scraping the sides once. 
Pour the filling into the crust. Bake until the center of the cheesecake moves just slightly when the pan is shaken, between 60-80 minutes. Remove from oven and cool to room temperature before covering and putting it in the fridge. Refrigerate for 12 hours before removing from the springform pan. 
In a small pot, combine sugar and water. Bring to a boil and simmer until the mixture turns a deep amber colour, about 10 minutes. Remove from heat and, in a steady stream, add cream while whisking. When the cream is completely added, continue to whisk until it is fully incorporated and set the pot back on the element. Let the mixture thicken just slightly, remove from heat, and stir in toasted pecans. Pour into a glass measuring cup and set aside until it cools completely.
Just before serving cheesecake, pour the pecan caramel over the cake. Cut and serve!
Recipe adapted from Family, Food, and Fun.

Panna Cotta & Florentine Cookies ~ February Daring Bakers’ Challenge

The February 2011 Daring Bakers’ challenge was hosted by Mallory from A Sofa in the Kitchen. She chose to challenge everyone to make Panna Cotta from a Giada De Laurentiis recipe and Nestle Florentine Cookies.

One evening, a few days into our trip to Germany, we had supper at Burg Schnellenberg in Attendorn. There was a group of us Canadians with a German fellow to brought us to the castle. Over supper I asked about why I couldn’t seem to find any ‘German’ food. You know, bratwursts and sauerkraut,… We were eating a lot of French and Italian food in Germany. It was as strange as eating Italian food in Mexico! Our German friend told us that what most people consider to be German foods are actually Polish. 
The best part of this whole story is that Germany is where I tried my first panna cotta. We had ordered 2 desserts from room service and I still can’t recall what the other one was. But I can still taste the panna cotta. For some reason, I still haven’t tried making a panna cotta so when it came up as February’s Daring Bakers’ Challenge, I was all over it! It became ‘the’ Valentine’s dessert and I am not ashamed to say that I ate mine, I ate the rest of Anya’s, and I ate the rest of Gavin’s…and I would have eaten another after that!
Unfortunately, I had forgotten all about the 2nd part of the Daring Baker’s Challenge (the florentine cookies) until this evening! I made them quickly while supper was being gobbled up by the hungry crew and then I ate 3 of them before taking the picture. They were like caramel crisps with chocolate in the middle! I’m so pleased that I took the time to make them!
Recipe Source: Panna Cotta, Florentine Cookies, Strawberry Gelee (as follows) by Mallory.
Strawberry Gelee

Ingredients

1 cup chopped strawberries
3 tablespoons water
1/4 cup white sugar
1 1/2 teaspoons unflavoured powdered gelatin
Directions

Sprinkle gelatin evenly over water. Place strawberries and sugar in a small saucepan and simmer until the sugar has dissolved. Mix the gelatin/water into the strawberries and stir until gelatin is dissolved. Remove from heat and allow to cool. Layer between panna cotta or distribute on top of panna cotta. Chill before serving.

Cranberry Bread Pudding

Filed under the “Give Me A Freaking Break”….
The baby is sick. Again. He was sick 2 weeks ago. He was sick 2 weeks before that. We had a completely sleepless night with him as he just couldn’t settle. At one point we considered bringing him to the hospital because his breathing was just ‘off’. He woke up at 8:30 still exhausted and lethargic. Luckily, he did perk up a little and he sounds a lot better but he just wants to be snuggled.
Tending to a sick baby has taken my full attention away from the other kids and one of them took advantage of the opportunity to colour all over the bathroom with a Sharpie marker. We have made so much progress on our renovations but the tiny terror keeps setting us back.
Bread pudding is a great way to use up stale bread/buns. Our house smelled divine while the pudding baked and the kids were surprised to discover that the pudding was made from the leftover buns! The icing is optional but why wouldn’t you put it on??? 
Cranberry Bread Pudding

Ingredients

Bread Pudding:
2 cups whole milk
1/4 cup butter
1/3 cup brown sugar
3 eggs
2 teaspoons cinnamon
1/4 teaspoon ground nutmeg
1 teaspoon vanilla extract
3 cups bread, torn into small pieces (I used stale dinner rolls)
1/2 cup craisins (or dried unsweetened cranberries)
Sauce:
1 cup whole milk
2 tablespoons butter
1/3 cup white sugar
1 teaspoon vanilla extract
1 tablespoon flour
Directions

For Bread Pudding:

Preheat oven to 350°. In a medium saucepan, over medium heat, heat milk just until a film forms over the top. Stir in butter until melted. Cool to lukewarm.

Combine brown sugar, eggs, cinnamon, nutmeg, and vanilla. Beat at medium speed for 1 minute. Slowly add to milk mixture while whisking.

Place bread cubes into a lightly greased casserole. Sprinkle with craisins. Pour milk/egg mixture evenly over the top. Bake for 45-50 minutes or until set.

For Sauce:

While the pudding is baking, mix all of the sauce ingredients together in a small pot and boil for 3-4 minutes, stirring constantly. Set aside for 5 minutes and then pour over pudding. Serve the pudding warm.

Recipe adapted from Moms Who Think.

Vanilla Custard Tarts with Chocolate Covered Strawberries

Happy Valentine’s Day…. a few days late… I had this post all ready to go on the day of love but I got tied up in other things. That seems to be the story of my life lately.

I had the opportunity to take Adam to his weekly basketball game by myself. No other kids..just him and I. It was strange to have so many empty seats in the van and even more strange when we were getting ready to leave and I didn’t have to corral a bunch of kids. It also gave him the opportunity to talk a little more openly about an issue he was having at school.

Adam enjoys basketball and he’s definitely built for the sport…lean and lanky. He was 22 inches long when he was born (the longest of all of my babies) with ridiculously long fingers and toes. Everyone said he would be a great piano player, but he wasn’t all that fond of having to practice piano. Getting to watch him play basketball was wonderful and I think he is a great little player…even if he was the smallest one on the court.

I found some pasta frolla in the freezer from November’s Daring Bakers’ Challenge and decided to whip up a quick dessert. I think the novelty of the chocolate dipped strawberries was the best part for the kids. As mentioned a couple of times, they like things dipped in chocolate.

Vanilla Custard Tarts

Ingredients

12 pre-baked pasta frolla tart shells
1 1/4 cups milk
1/2 vanilla beans, split lengthwise
3 large egg yolks
1/4 cup white sugar
1/8 cup flour
scant 3 tablespoons cornstarch
1/2 to 1 cup whipped cream
12 chocolate dipped strawberries
Directions

Pre-bake the pasta frolla tart shells until golden brown (10-12 minutes). Cool completely.
In a medium sized bowl, mix sugar and egg yolks together with a wooden spoon. Sift the flour and cornstarch together and then add to the egg mixture. Mix until you get a smooth paste and set aside.
Meanwhile, in a medium sized saucepan, combine the milk and split vanilla bean over medium heat until boiling. Remove from the heat and slowly add to egg mixture, whisking constantly. Remove vanilla bean, scrape out seeds, and add the seeds into the mixture. 
Place the egg mixture back into the saucepan and cook over medium heat until boiling, whisking constantly. When it boils, whisk for another 30-60 seconds, until it becomes very thick.
Remove from heat and let it cool slightly, 10-15 minutes, before pouring evenly into the 12 tart shells. Refrigerate with a layer of plastic wrap directly on the custard to prevent a skin from forming. Before serving, top with whipped cream and a chocolate dipped strawberry.
Recipe adapted from Joy of Baking.